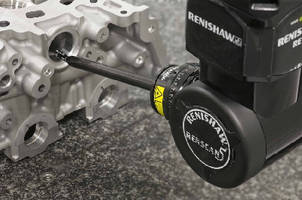
Five-Axis CMM uses probe for surface finish inspection.
Press Release Summary:

With SFP1 probe option, featuring 6.3 to 0.05 Ra measurement capability, REVO® 5-Axis CMM integrates surface finish inspection within coordinate measurement routines. Probe comes with straight and cranked styli, which are selected via measurement program control using modular rack system. With straight stylus, SFP1 can perform measurement trace within 10 mm diameter bore to depth of 100 mm. Skidded probe, featuring 2 µm radius diamond stylus tip, outputs Ra, RMS, and raw data formats.
Original Press Release:
Another First in Coordinate Measurement Technology - Renishaw Introduces Surface Finish Measurement for CMMs with New Probe for REVO® Five-Axis System
Renishaw’s new SFP1 probe option for the REVO® five-axis measurement system is the first to allow surface finish inspection to be fully integrated within coordinate measurement routines.
With a measurement capability of 6.3 to 0.05 Ra, the SFP1 surface finish probe makes the CMM a “single platform” metrology system. It eliminates the need for hand-held surface measurement devices or transporting parts to a dedicated surface measuring machine, reducing labor costs and inspection lead times. The system allows automated switching between dimensional measurement and surface finish measurement, with the analysis contained in a single report.
The SFP1 probe is a fully integrated option for the REVO 5-axis measurement system, supplied with two dedicated styli, straight and cranked, which are selected via the measurement program control using the system’s modular rack system (MRS). The probe incorporates a C axis that, combined with the infinite positioning of the REVO head and choice of stylus holders, allows the probe tip to be automatically oriented to any angle to suit the part, ensuring that the highest quality surface data is acquired. This enables flexible access to component features, combined with the consistency of fully automated CNC control. Using the straight stylus, the SFP1 can perform a measurement trace within a 10 mm diameter bore to a depth of 100 mm.
A skidded probe with a 2 µm (0.000079 in) radius diamond stylus tip, the SFP1 probe outputs Ra, RMS and raw data formats to the metrology application software via Renishaw’s UCCServer software, using the I++ DME protocol. The raw data can subsequently be presented to specialized surface analysis software for more detailed reporting.
Automated surface finish probe calibration
Calibration of the probe is also automated under the CMM program. A surface finish calibration artifact (SFA) is mounted on the MRS rack and is measured using the SFP1 probe. Software then adjusts parameters within the probe in accordance with the artifact’s calibrated value.
For more information about Renishaw's CMM probe systems, software, or CMM retrofit service, visit http://www.renishaw.com/probes.
Contact
Jeff Seliga
Renishaw Inc.Â
5277 Trillium Blvd.
Hoffman Estates, IL 60192
Tel: 847.286.9953
Fax: 847.286.9974
jeffrey.seliga@renishaw.com
Inquiries should be directed to:
In USA: Susan Wilm, Marketing Assistant, Renishaw Inc., 5277 Trillium Blvd., Hoffman Estates, IL 60192. susan.wilm@renishaw.com Tel: 847.286.9953
In Canada: Dafydd Williams, General Manager, Renishaw (Canada) Limited, 2180 Dunwin Drive, Unit #1, Mississauga ONT L5L 5M8. dafydd.williams@renishaw.com Tel: 905.828.0104


