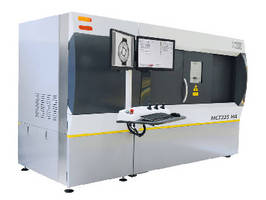
Metrology CT System offers magnification up to 200x.
Share:
Press Release Summary:

Based on actively cooled, 225 kV micro-focus X-ray source, MCT225 HA supports range of sample sizes and material densities with 3.8+ L/50 µm MPEl accuracy in accordance with VDI/VDE 2630 guideline. System features manipulator guideways equipped with high-resolution optical encoders. Guideways are error corrected using laser interferometer mapping techniques. To minimize thermal effects, interior of enclosure is temperature controlled, creating conditioned measurement room stable to 20°C ±0.1°C.
Original Press Release:
Nikon Metrology Announces High Accuracy Metrology CT System
The new MCT225 HA combines more than 95 years of Nikon experience in optical metrology, 50 years of LK experience in CMM metrology and 25 years of X-Tek experience in Computed Tomography (CT). MCT225 HA – the most accurate in its class – provides high accuracy Metrology CT for a wide range of sample sizes and material densities with 3.8+ L/50 µm MPEl accuracy in accordance with the VDI/VDE 2630 guideline. All internal and external geometry is measured efficiently in a single non-destructive process. A full 3D visualization of the sample volume additionally provides valuable insights into part deformations and internal structural integrity.
Metrology CT, the future of dimensional inspection
Metrology CT is the fusion of metrology and X-ray Computed Tomography (CT). X-ray has long been used for industrial applications. With X-ray CT a number of 2D X-ray images are taken at different angles around the sample. All of the external and internal geometry is captured as the X-rays pass through the sample. CT software constructs a 3D model of the sample using these 2D images. Dimensional characteristics such as size, position and form can be measured directly using the model as well as full part-to-CAD comparison, section reporting and GD&T analysis.
Absolute accuracy for internal geometry
MCT225 HA is set up in the factory using accuracy standards traceable to the UK's national measurement institute (NPL) and verified using VDI/VDE 2630 guidelines for Computed Tomography in Dimensional Measurement. “Absolute accuracy” guarantees measurement accuracy without time consuming comparative scans or reference measurements; samples are simply placed on a rotary table inside the enclosure and measured.
The key component of the MCT225 HA system is the in-house developed 225 kV micro-focus X-ray source that is actively cooled for thermal stability. The X-ray “CoolGun” in combination with the high resolution panel detector produces incredibly sharp images with low noise levels, enabling magnification levels up to 200x.
Another key component of the MCT225 HA is the high-precision manipulator developed in close cooperation with the Nikon development team in Japan. The manipulator guideways are equipped with high-resolution optical encoders and error corrected using the laser interferometer mapping techniques employed for CMMs. For optimal accuracy and long term stability, Finite Element Analysis (FEA) was used during the design phase to optimize the stiffness of the manipulator.
The manipulator has been suspended on anti-vibration mounts to eliminate external vibration influences. To minimize thermal effects the interior of the MCT225 HA enclosure is temperature controlled, effectively creating a conditioned measurement room stable to 20°C ± 0.1°C.
Flexible efficiency for first article inspection
MCT255 HA is an invaluable asset for manufacturers seeking to benefit from reduced lead times and inspection cycles. The powerful X-ray source and large capacity manipulator combine with high magnification and detailed feature detection to create a solution suited to a wide variety of applications.
Plastic injection-mold and metal die-cast manufacturers can significantly reduce correction cycles during tool development and production start-up, accelerating time to market for new products. All shrinkage, deformation and dimensional errors are clearly identified in easy-to-understand inspection reports making it easier to define corrective actions.
Emerging production techniques like additive manufacturing now make it possible to produce small and highly complex components that cannot be inspected using touch probes or optical sensors. Here too the MCT225 HA makes it possible to measure and analyze these components in a single non-destructive operation.
ABOUT NIKON METROLOGY
Nikon Metrology offers the broadest range of metrology solutions for applications ranging from miniature electronics to the largest aircraft. Nikon Metrology’s innovative measuring and precision instruments contribute to a high performance design-for-manufacturing process that allows manufacturers to deliver premium quality products in a shorter time. Further information is available on www.nikonmetrology.com
For further information please contact:
Renaat Van Cauter, Director Marketing Communications
Nikon Metrology NV,Geldenaaksebaan 329, B3001 Leuven, Belgium
renaat.vancauter@nikonmetrology.com; Tel +32 16 74 01 00


